Nov 25, 2020
How to Prevent Code Injection Vulnerabilities in Serverless Applications (Part 1/2)
Recently Serverless application architectures are a trending model for web application development. This is …


This article is Part 2 of a series. Here, I’m going to explain how to secure Serverless applications from injection attacks using AWS Web Application Firewalls (WAF).
In Part 1 I introduced ServerlessGoat, an intentionally vulnerable serverless MS-Word .doc to text converter service. I explained how to exploit its code injection vulnerability and how to fix the vulnerability by replacing an invocation of the command-line tool cat with a proper JS library to download the MS-Word document. Furthermore, I shortly introduced input validation with denylists, i.e., excluding inputs that contain specific characters or match a certain format, and allowlists, i.e., only allowing inputs with a certain format or input that matches an item in a given list of constants. Let’s dive deep into how AWS WAF can help us implementing allow-/deny-lists for input validation!
If you missed out on Part 1, feel free to catch up!
Input validation can of course be implemented in the serverless function directly — and should be according to security best practices. However, serverless infrastructures often contain a plethora of different functions that might all profit from similar input validation in which case it makes sense to use a central point for additional pre-sanitization.
Fortunately, with Web Application Firewalls (WAF) AWS proposes a means to conduct input validation for multiple functions even before they are invoked at all. WAFs can be attached to API gateways and Load Balancers and already allow the use of pre-configured rules for the OWASP Top-Ten as described in the corresponding whitepaper.
Implementing a Denylist with AWS WAF
Using WAF, it is straight forward to implement a basic denylist approach and attach it to the ServerlessGoat API gateway. WAF specifications can be created with the AWS console, CLI, and REST API. For the sake of simplicity, I’m going to explain how to setup WAF in the AWS console. This allows for easier testing and playing around with WAF using a proper graphical user interface.
After deploying the ServerlessGoat application, let’s follow the documentation to set up an Access Control List (ACL) for WAF in the created API gateway. Like in traditional firewalls, ACLs are lists that allow/prevent access from specific sources to specific assets based on rules.
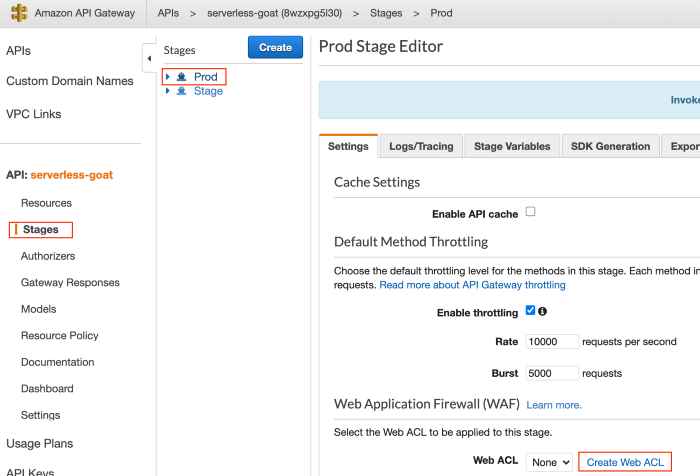
Step 1: Open the API Gateway console for the serverless-goat API -> go to Stages -> open Prod stage -> create a new Web ACL
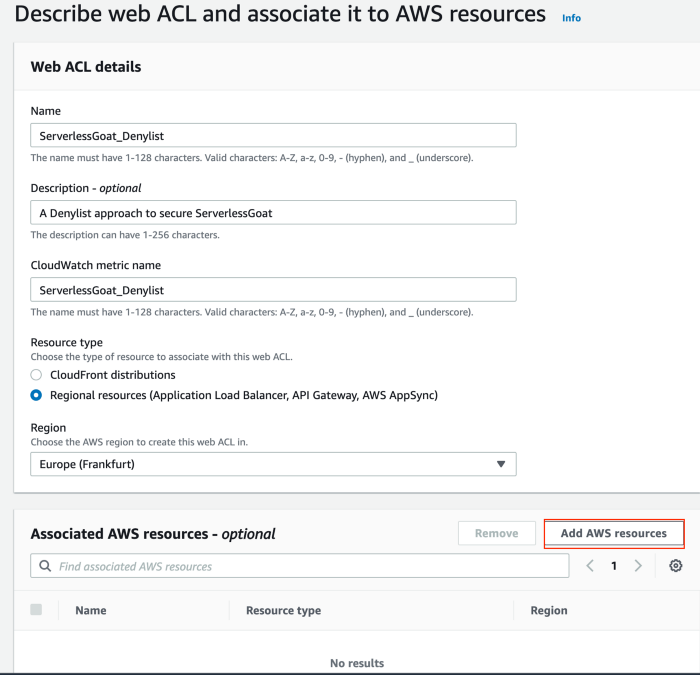
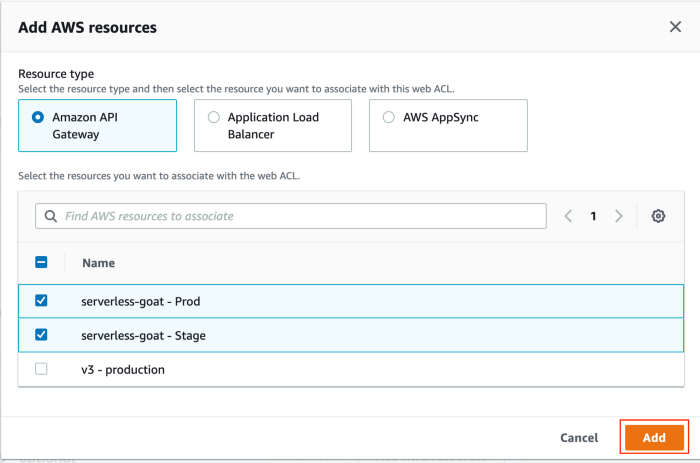
Step 2: In the Web ACLs console, press Create Web ACL. Fill-in metadata for the ACL and press Add AWS resources
Step 3: Select the Prod and Stage stages of the serverless-goat API gateway ->Press ADD -> Press Next to add rules to the ACL
Step 4: In the Add rules and rule groups view, click on Add rules and then select Add my own rules and rule groups
Step 5: Use the visual rule editor to create a rule that applies if a semicolon (;) character is contained in the document_url query string parameter -> Since we are building a denylist, make sure to block the request if the rule applies -> Add the rule
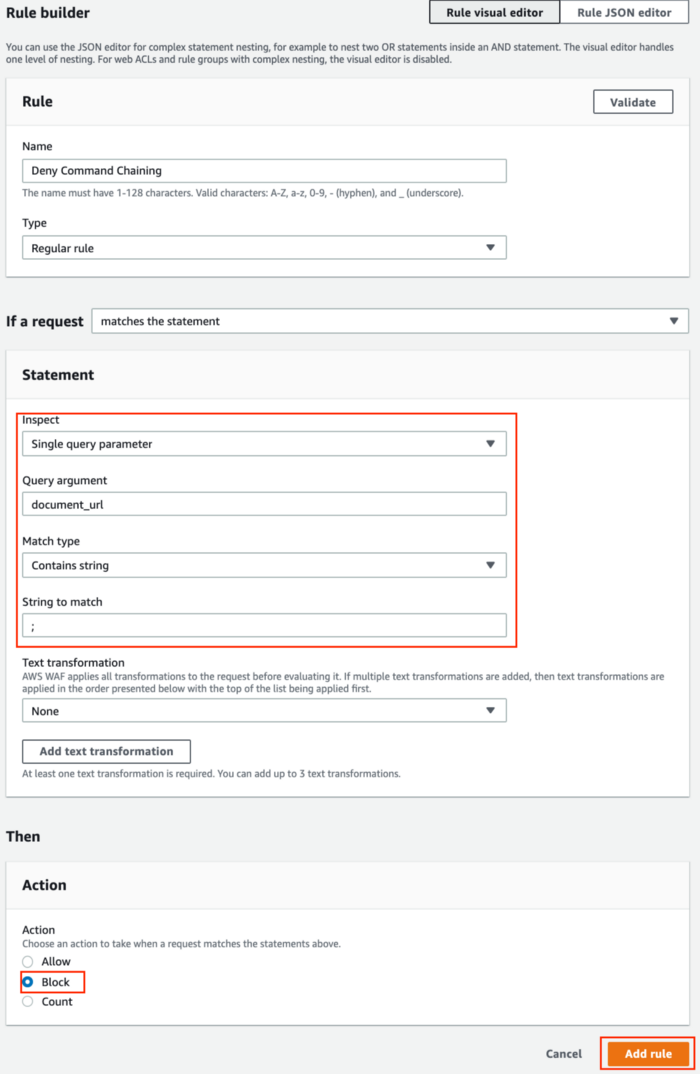
Step 6: Make sure to allow all requests that do not match any rule! We want to only exclude requests where the document_url query string parameter contains a semicolon. -> Press Next -> Next -> Next -> Create the web ACL
AWS will take some time to set up the ACL and attach it to the API gateway stages. After the creation is completed, we can test if our denylist behaves as expected.
Browse to the Prod stage view of the serverless-goat API gateway. You can now see the ACL being correctly assigned to the stage. Expand the /api/convert endpoint to acquire the endpoint URL of the stage:

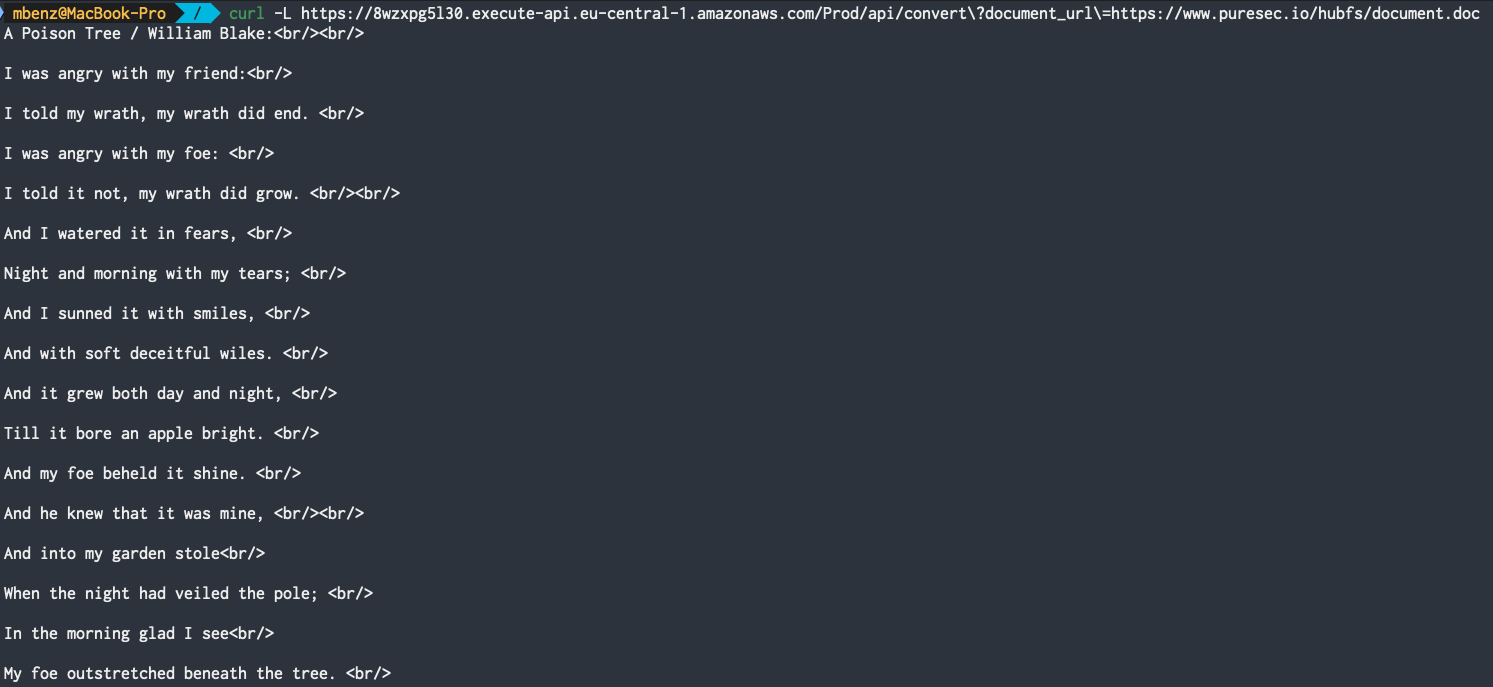
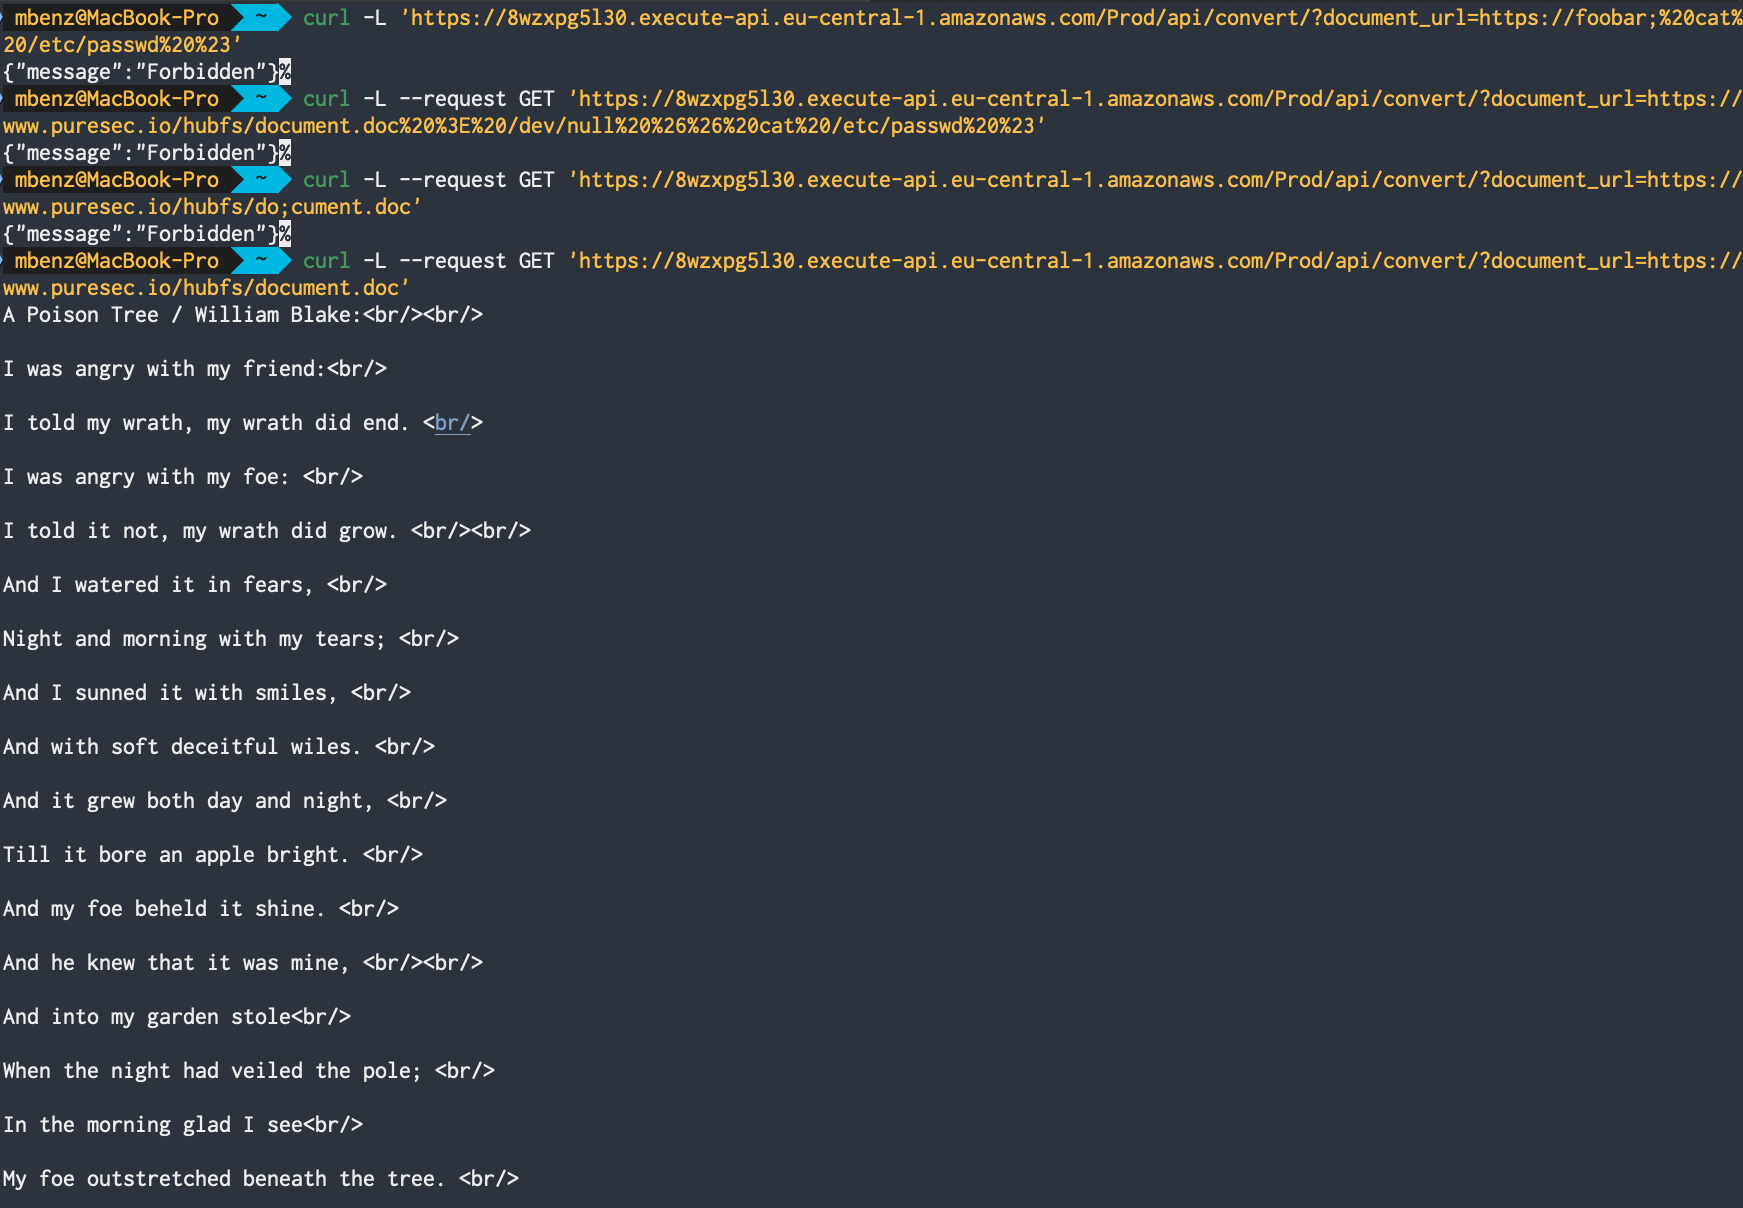
Using this URL, we can now test our denylist. If we propose a valid MS-Word document to the document_url parameter, we get back the contained text as plaintext:
Trying to attack the Goat with https://foobar; cat /etc/passwd # now results in Forbidden, as our WAF has successfully detected the semicolon char in the input parameter:

Pitfalls of Denylists
Are we secure now? NO! 😦 We just prevented the specific attack where commands are chained with a semicolon. However, bash at least allows for a bunch of other possible solutions to chain and inject additional commands into the OS command, e.g., using && or || (to only name a few).
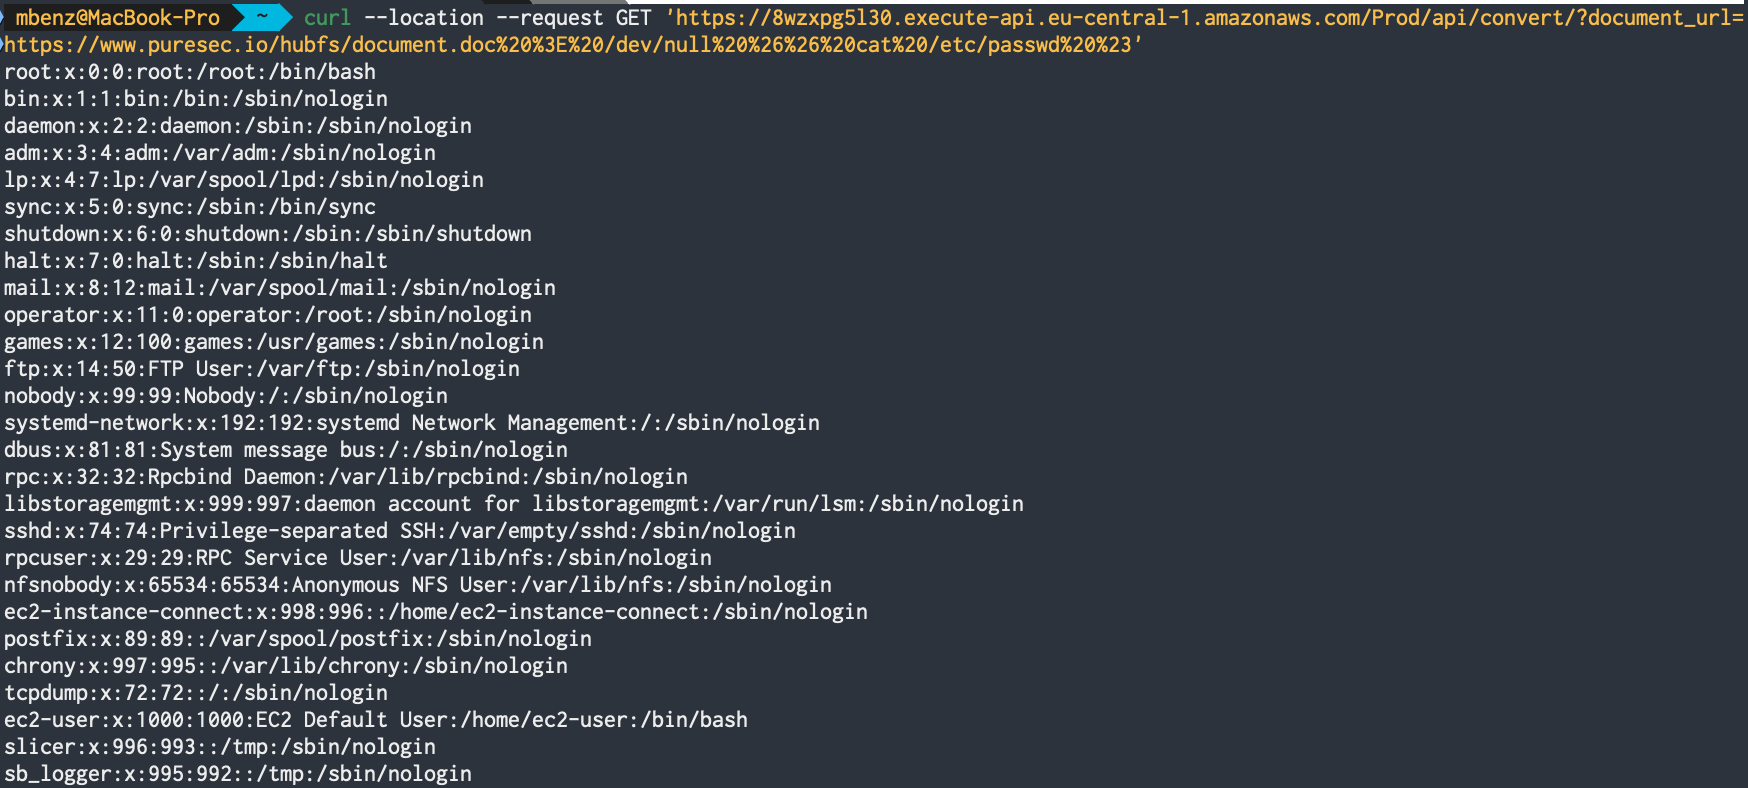
If we now propose https://www.puresec.io/hubfs/document.doc > /dev/null && cat /etc/passwd # as document_url, where we throw away the output of the curl command by directing it to /dev/null and then chain the invocation of cat with the && (and) operator, we are still able to exploit the command injection vulnerability to read /etc/passwd :
This boils down to a general problem with denylists: It is very hard to come up with all possibly problematic inputs and specifically filter out requests that contain those. It’s almost guaranteed that an attacker will be able to find a proper input that circumvents the rules of a denylist by using specific publicly accessible enumeration tools. But how to properly validate the input then? Use allowlists to only allow very specific input formats and deny everything else!
Implementing allowlists with WAF is as easy as implementing denylists. For our allowlist, we want to come up with a pattern that is as specific as possible to only match a proper input document. Let’s, therefore, create a regular expression to match a valid document_url.
For this, we again open the AWS Firewall Manager -> Select the Regex pattern sets view -> Press Create regex pattern set
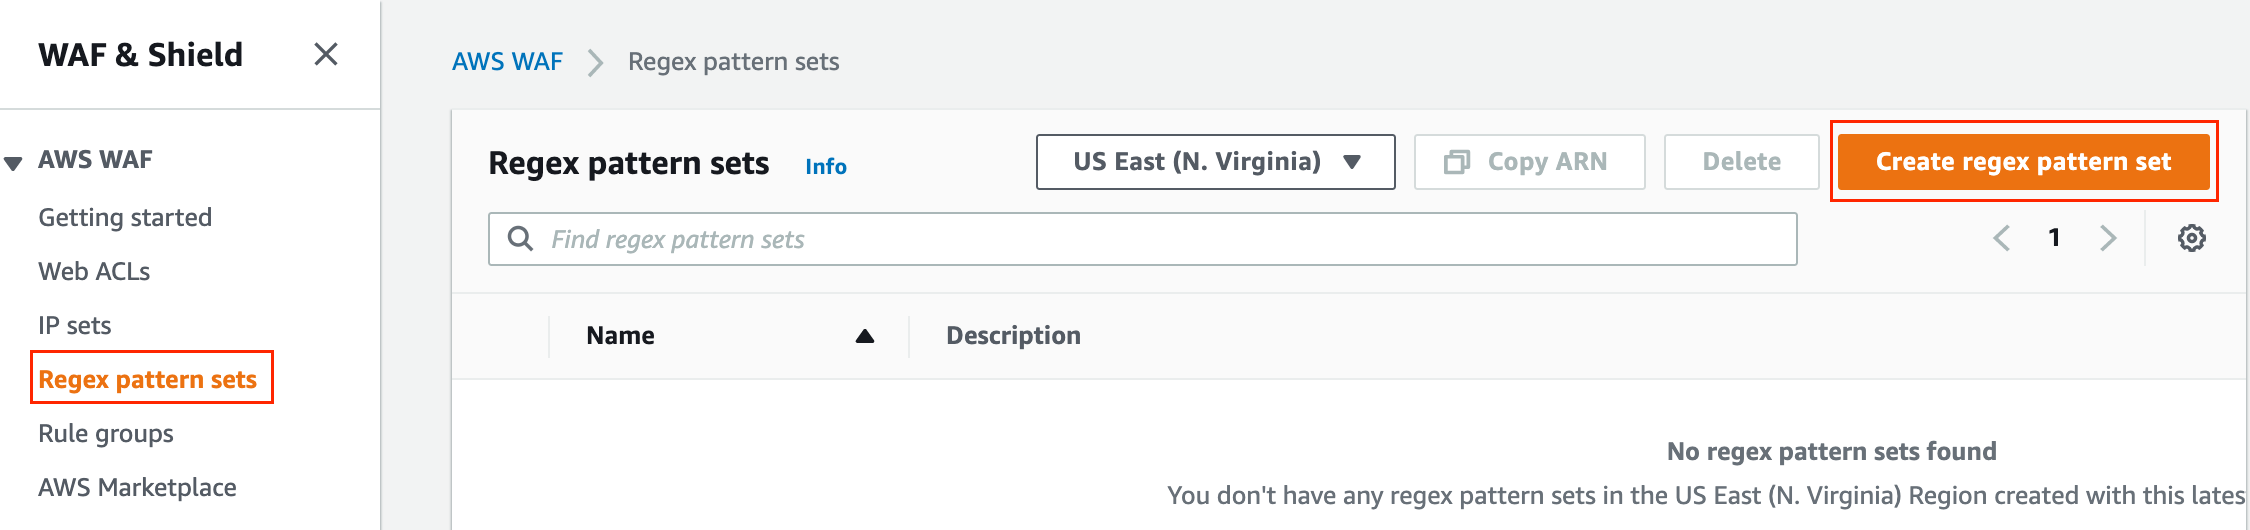
We now create a regular expression in our region that only matches URLs starting with http(s), ending with .doc, and nothing in between but plain words and slashes (/). Thereby, we especially prevent an attacker from adding any bogus input before, after, or in between the provided URL:
Now, we want to add the previously created regular expression as a filter to our ACL:
Go to Rules tab -> Add rules -> Add my own rules and rule groups
The setup is similar as in Step 5. This time, however, we are using our previously created regular expression as matcher:

Remember, we are building an allowlist. Thus, make sure that this time, to allow requests where the document_url query parameter matches this rule.
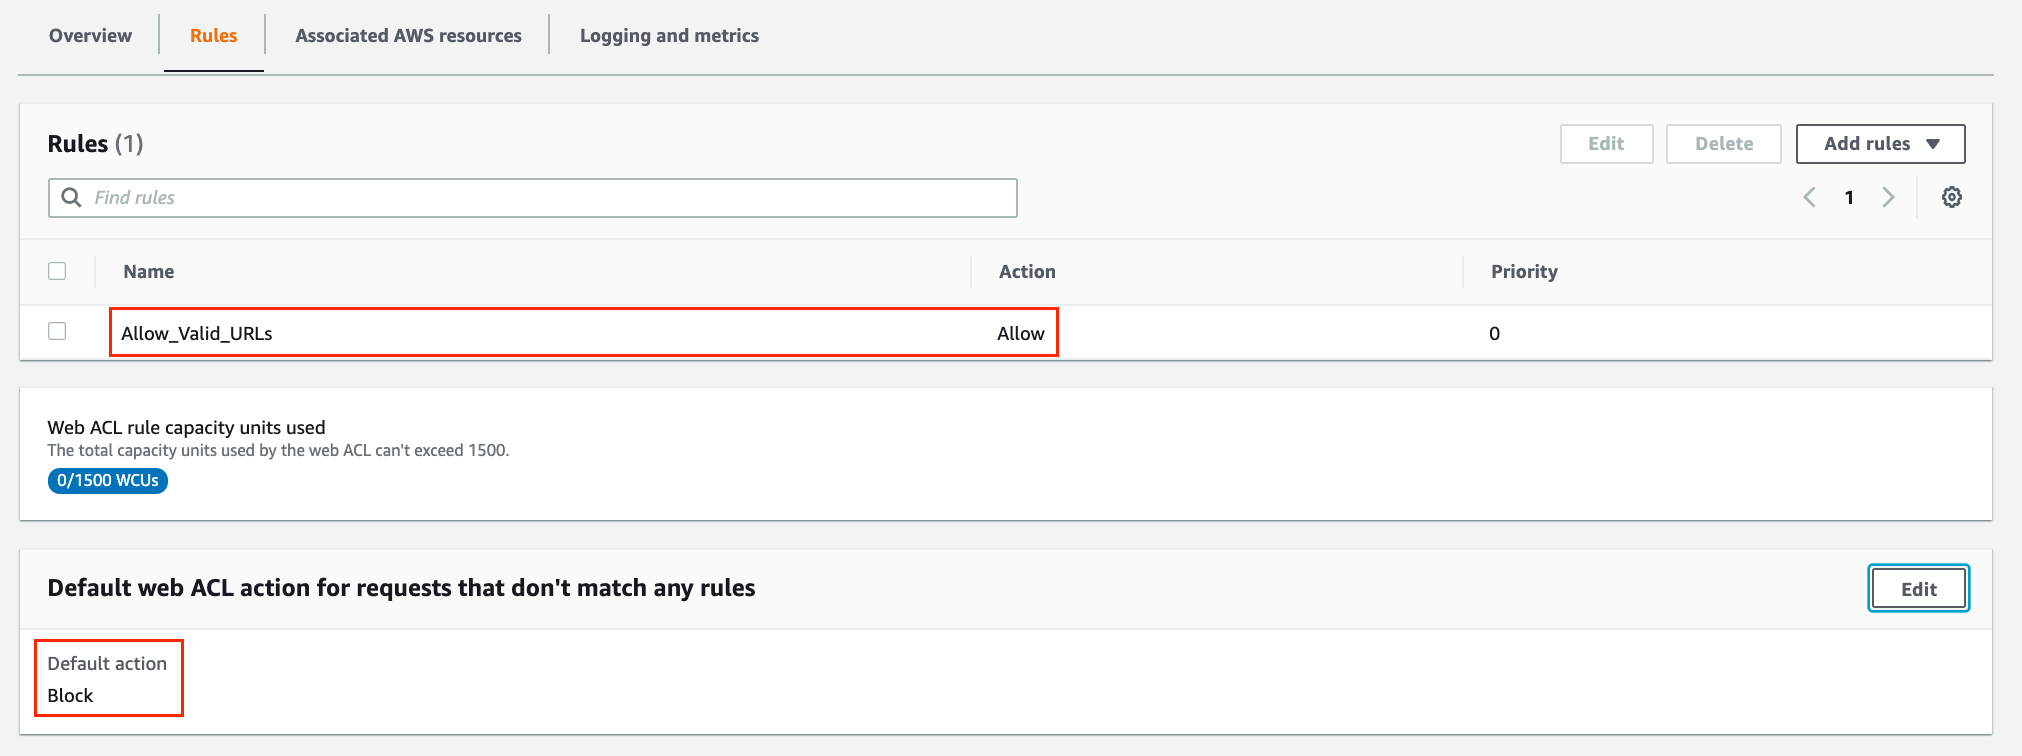
To finalize the allowlist, we now have to make sure that our previously created rule from the denylist is not active anymore and we only allow requests that match our newly created Allow_Valid_URLs rule. Therefore, after creating the new rule, delete the old Deny_Command_Chaining rule and set the default web ACL action for requests that don’t match any rules to Block.
The rule section of our ACL should now look like this:
Since we edited the existing ACL that is already bound to our API gateway, we do not have to conduct any further steps. Let’s test our allowlist:
As we can see, none of our attacks is working anymore and we are still able to use the service with a valid document_url. 👍
Are we secure now? Well, ServerlessGoat has quite some more issues waiting to get fixed — at least we secured our app from Command Injection Attacks now! 🛡
Keep in mind, however: Realistic apps are much harder to overlook and you can never be sure that your WAF restricts bogus data to flow to your function through every possible channel. Therefore, in addition to a WAF, never trust the inputs to your lambda functions and implement additional counter measurements in your code!
We develop CodeShield to help developers finding and fixing vulnerabilities in serverless applications. Check out our product tour to try it yourself!

Manuel Benz is CTO and Co-Founder of CodeShield.
Recently Serverless application architectures are a trending model for web application development. This is …
Checkout Serverless Goat for Java and train your security skills. The code is available under …

Static application security testing tools are notorious for presenting false positives, i.e., incorrect …